AWS is a great place to host static content: Bandwidth / hosting costs are very cheap if you’re at “hobbyist” scale, you get great availability, and AWS gives you free SSL termination / certificate management for HTTPS if you get everything setup correctly.
This tutorial will walk you through the process of hosting a HTTPS-enabled static site on AWS with a custom domain. For the purposes of this tutorial, I’ll be using NameCheap as my domain name registrar, but these steps should map pretty easily onto other registration services.
Overview
We’ll be setting up 4 AWS services in the process of setting up our static website. To give a bit of context, here’s what each of these services provides us:
- ACM - “AWS Certificate Manager”. This lets us generate an SSL certificate for our custom domain name, which is used to setup HTTPS for our site.
- S3 - “Simple Storage Service”. This is the service where we can upload our static content to a “bucket”, which will then be served to visitors of our website.
- CloudFront - CloudFront is AWS’s content delivery network, which will distribute our static content to nodes around the globe, providing a better user experience for worldwide traffic. CloudFront ads a bit of cost to our hosting fees, but it gives us SSL termination for HTTPS for free, which is why we’re opting to use it.
- Route53 - This will manage our DNS routing, and allow us to point our custom domain at our CloudFront distribution.
What You’ll Need
- A custom domain name with the ability to forward email (this is for domain verification purposes)
- An AWS account
- About 30 minutes to set everything up
Table of Contents
- Step 1: Generate an SSL certificate
- Step 2: Setup an S3 bucket for Static Hosting
- Step 3: Create CloudFront Distribution with SSL Termination
- Step 4: Configure Route53 to Route Traffic From Our Custom Domain
- A Word on Pricing
- Alternative DNS Routing Approaches
- Closing
- Footnotes
Setup
Step 1: Generate an SSL certificate
To have Amazon generate a certificate for us, we will need to prove that we own our custom domain by receiving an email at it. Then, AWS will create and manage an SSL certificate for our domain.
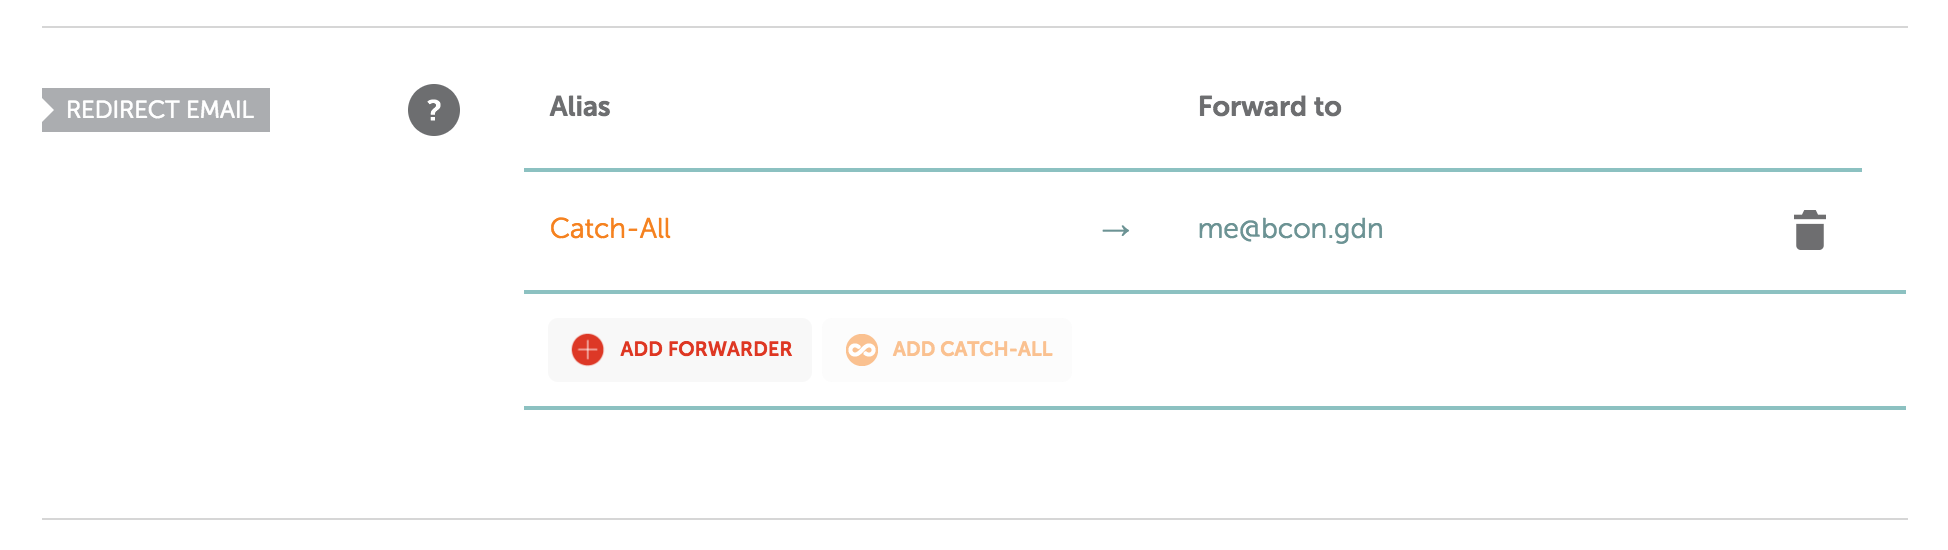
- Setup an email redirect with your domain registrar to redirect “admin@your-domain” to an email inbox that you can receive email at.1 The easiest way I found to do this was to just redirect all email at my domain to my personal inbox, via NameCheap’s email redirect service.
-
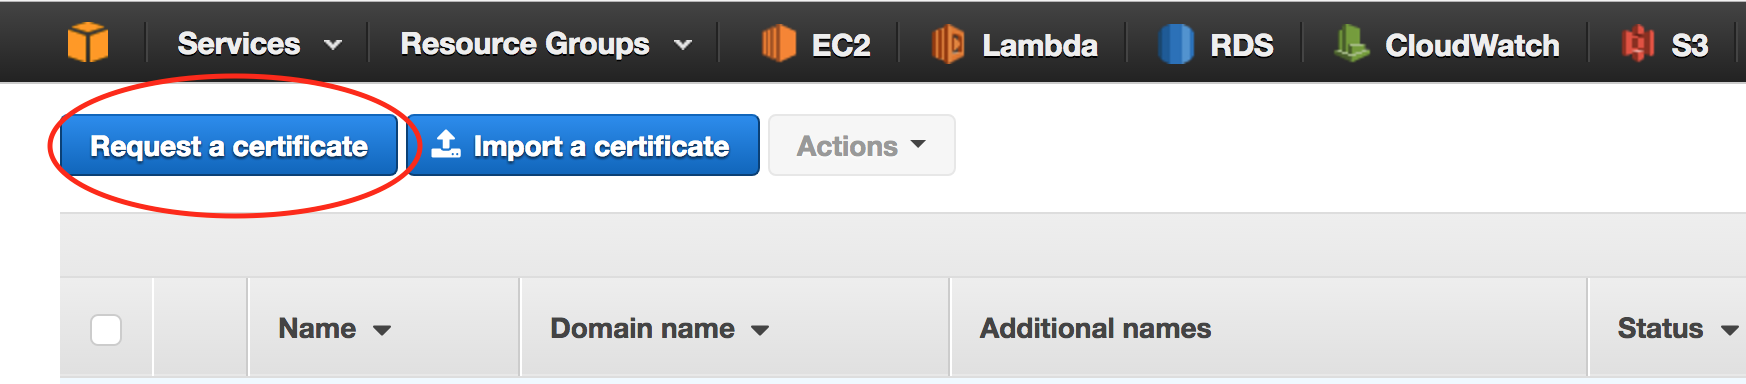
Go to the ACM Dashboard and click “Request a Certificate”.
-
Enter your custom domain name and your domain name prepended with
www., then click “Review and Request”.2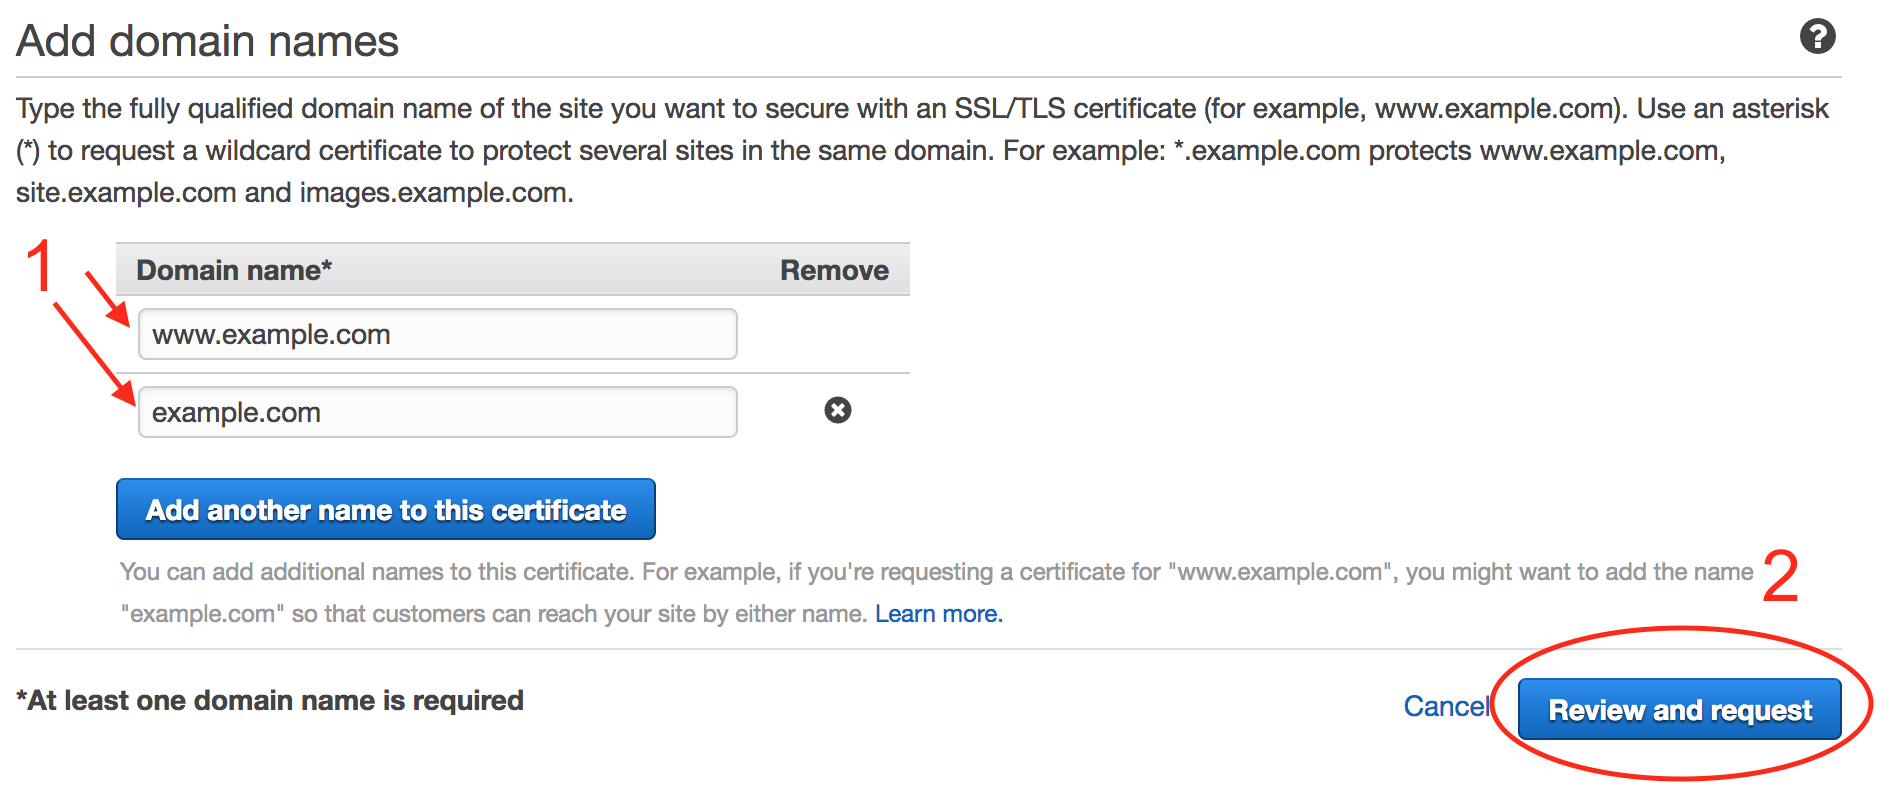
-
Check your email and click on the approval link. Then click “I Approve” on the approval screen you’ll be shown.
-
If you return to the ACM Dashboard, you should see that your certificate has been issued.

Step 2: Setup an S3 bucket for Static Hosting
Now we’ll create an S3 bucket to hold out site’s static content.
- Go to the AWS S3 Dashboard and click “Create a New Bucket”

- Enter your domain name as the name of your bucket.3 Click “Next” twice to go to “Set permissions”.
- The only permission we need to change is to allow “Everyone” to be able to Read Objects.
- Click “Next” again and finish creating the bucket.
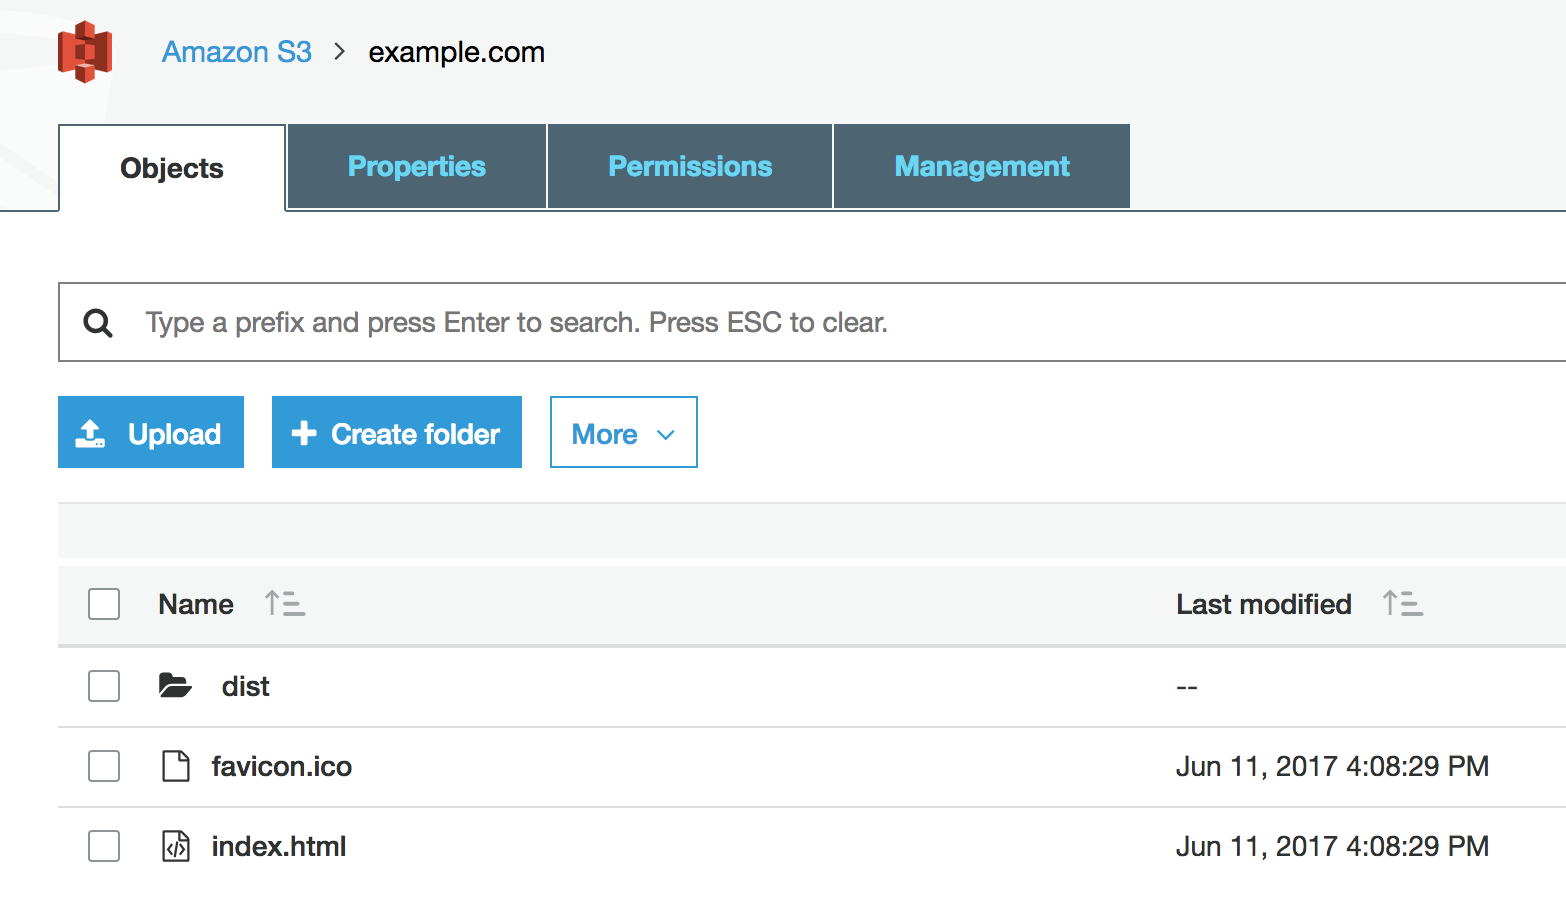
- Click on your newly created bucket to open it, and upload the static content for your website (HTML, CSS, JS).
Important: This bucket will be the only thing that you will have to interact with after completing this guide. Making changes to the content in this bucket will change the content served as your site. You can edit your HTML/CSS/JS, and the changes will be reflected almost immediately to the outside world.
Step 3: Create CloudFront Distribution with SSL Termination
With the content of our website now upload to AWS, we’ll configure CloudFront to serve it to the public.
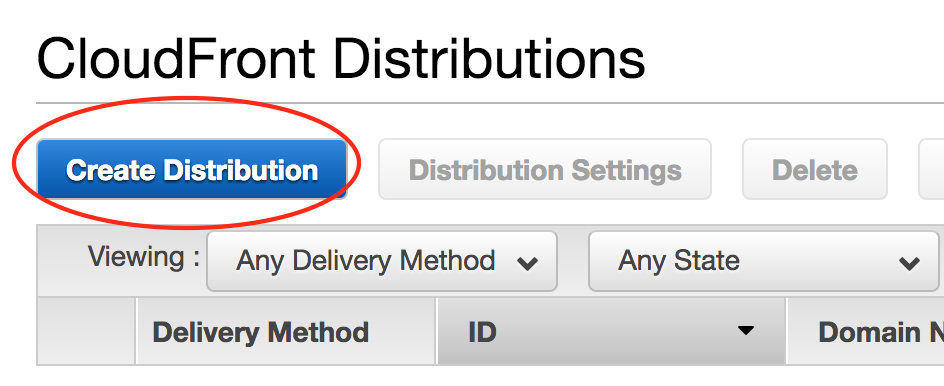
- Go to the AWS CloudFront dashboard and click “Create Distribution”, then click “Get Started” under the “Web” subheader.
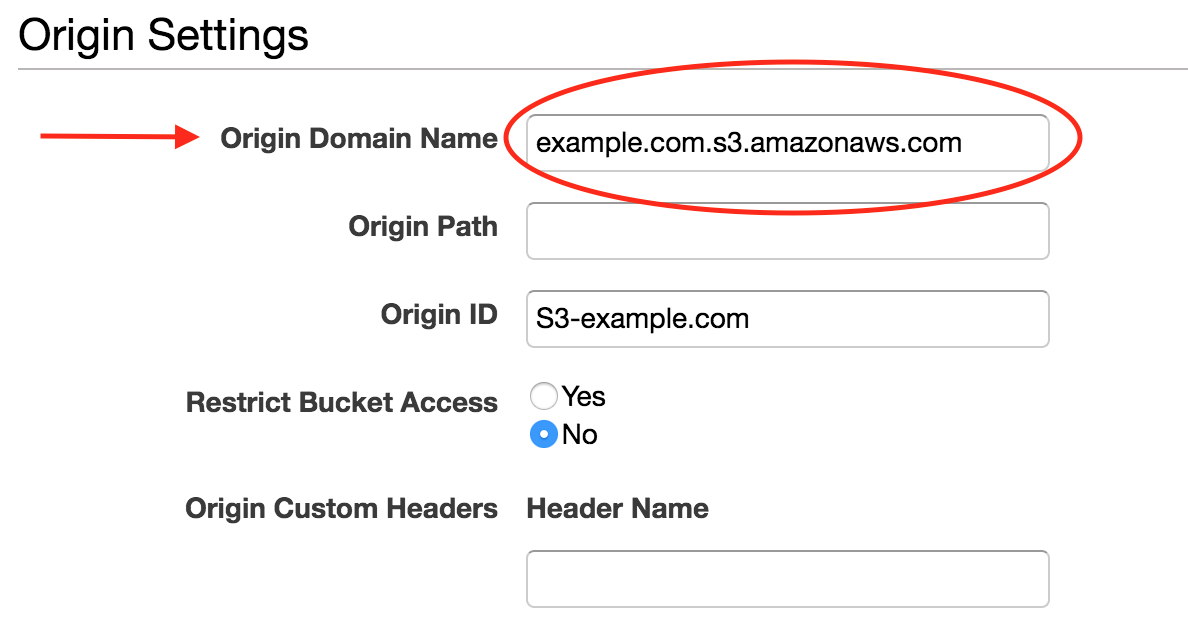
- In the “Origin Domain Name” box, find the S3 bucket we created earlier. You should find that OriginID gets set accordingly. This will tell our CloudFront distribution to serve files from our S3 storage bucket.
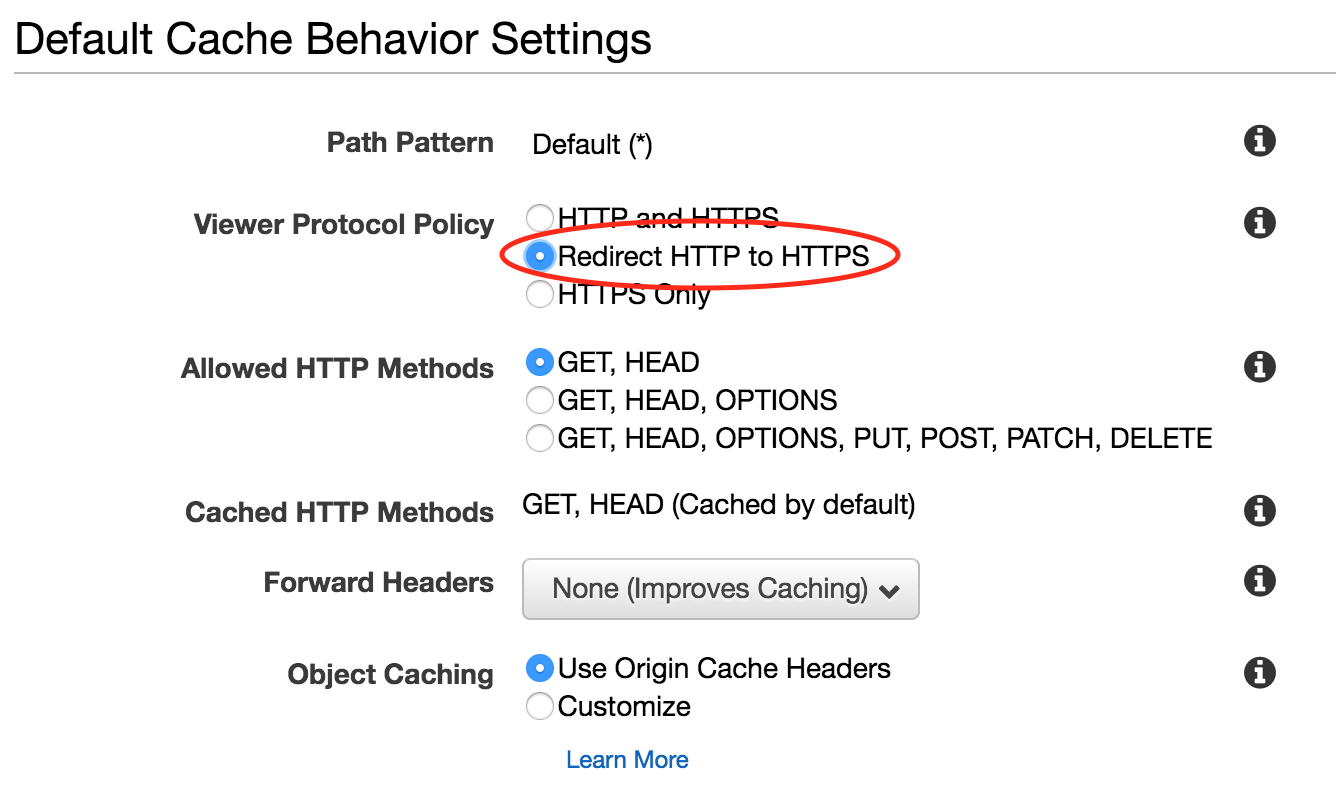
- Under “Default Cache Behavior Settings”, select “Redirect HTTP to HTTPS” to try to enforce HTTPS on all requests to CloudFront.
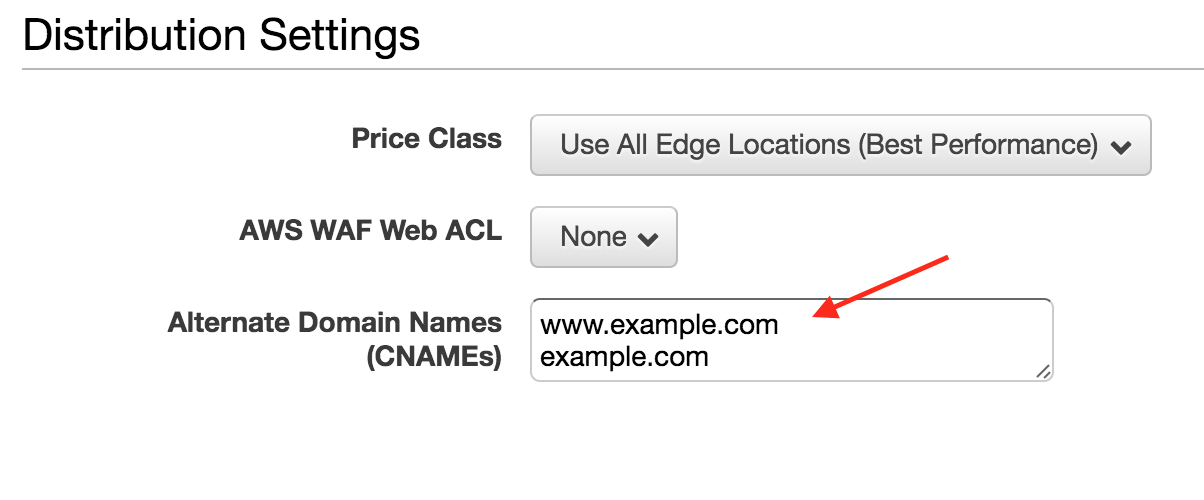
- Under “Distribution Settings”, add your custom domain name and your “www.” subdomain into the “Alternate Domain Names” box. This will allow traffic that will eventually be routed to CloudFront to be accepted. Note that you have choices under Price Class. “Use All Edge Locations” is chosen by default, but the other options in that dropdown will be slightly less expensive, at the ‘cost’ of higher latencies in some regions.4
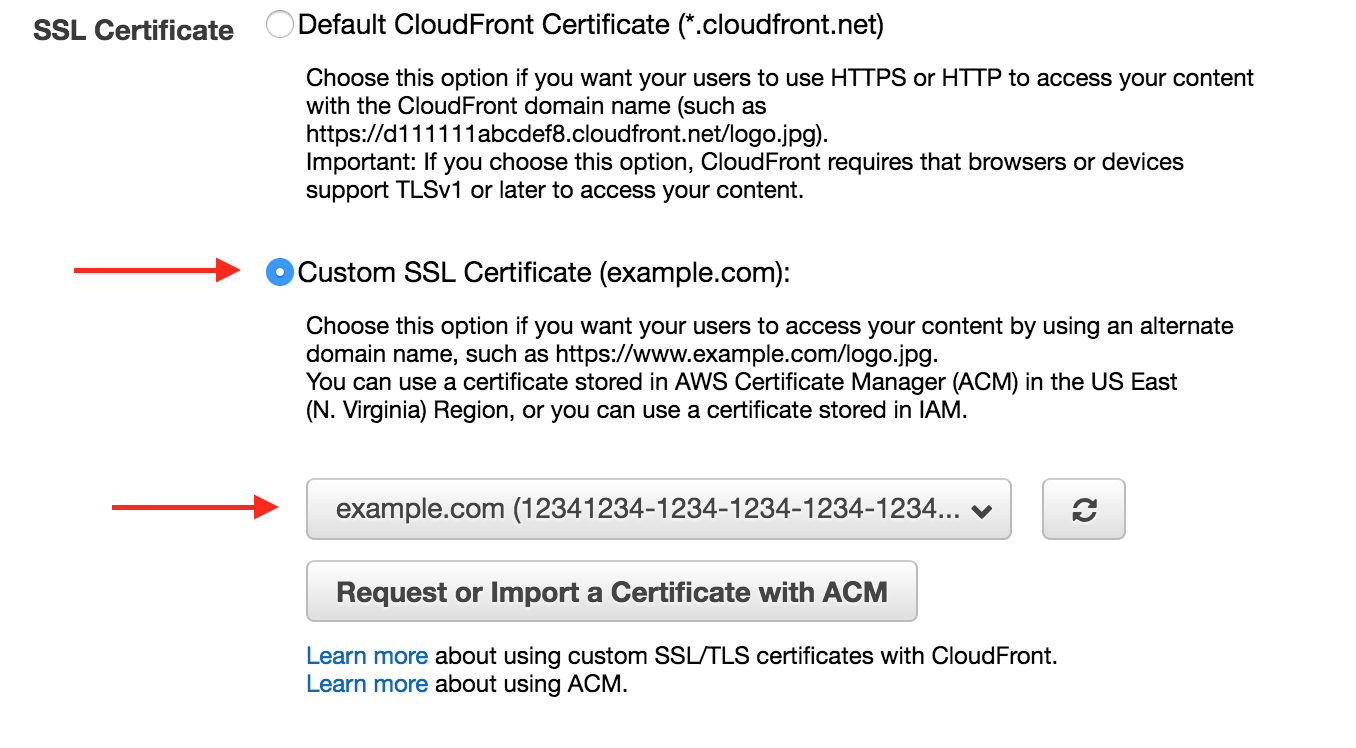
- Now we can setup SSL termination. Select “Custom SSL Certificate”, then choose the SSL certificate for your domain that we created earlier.
- Enter the root page for you website under “Default Root Object” (usually
index.html). This will be the page served when someone visitshttp://example.com/.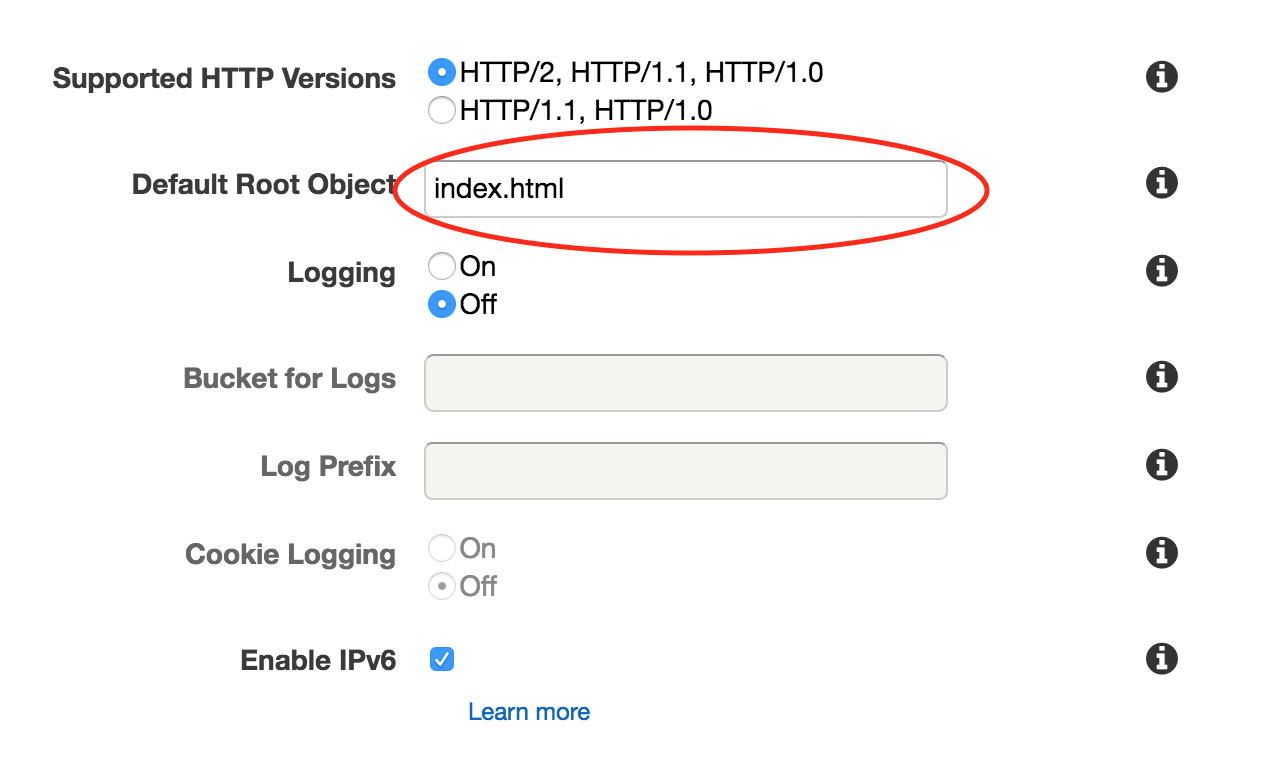
- Finish creating the distribution by clicking “Create Distribution”.
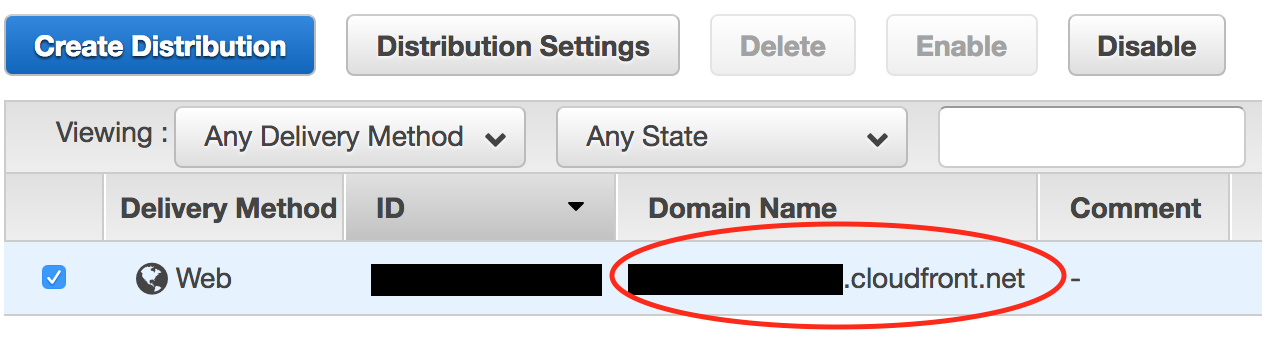
- You can go to the URL specified under the “Domain Name” header of your new distribution to verify that everything is working. If everything worked, you should get the happy green “Secure” lock on Chrome.
Step 4: Configure Route53 to Route Traffic From Our Custom Domain
Now we will use Route53 - Amazon’s DNS routing service - to point our custom domain name at our CloudFront distribution.
- Go to the AWS Route53 dashboard, go to “Hosted zones” and click “Create a Hosted Zone”.
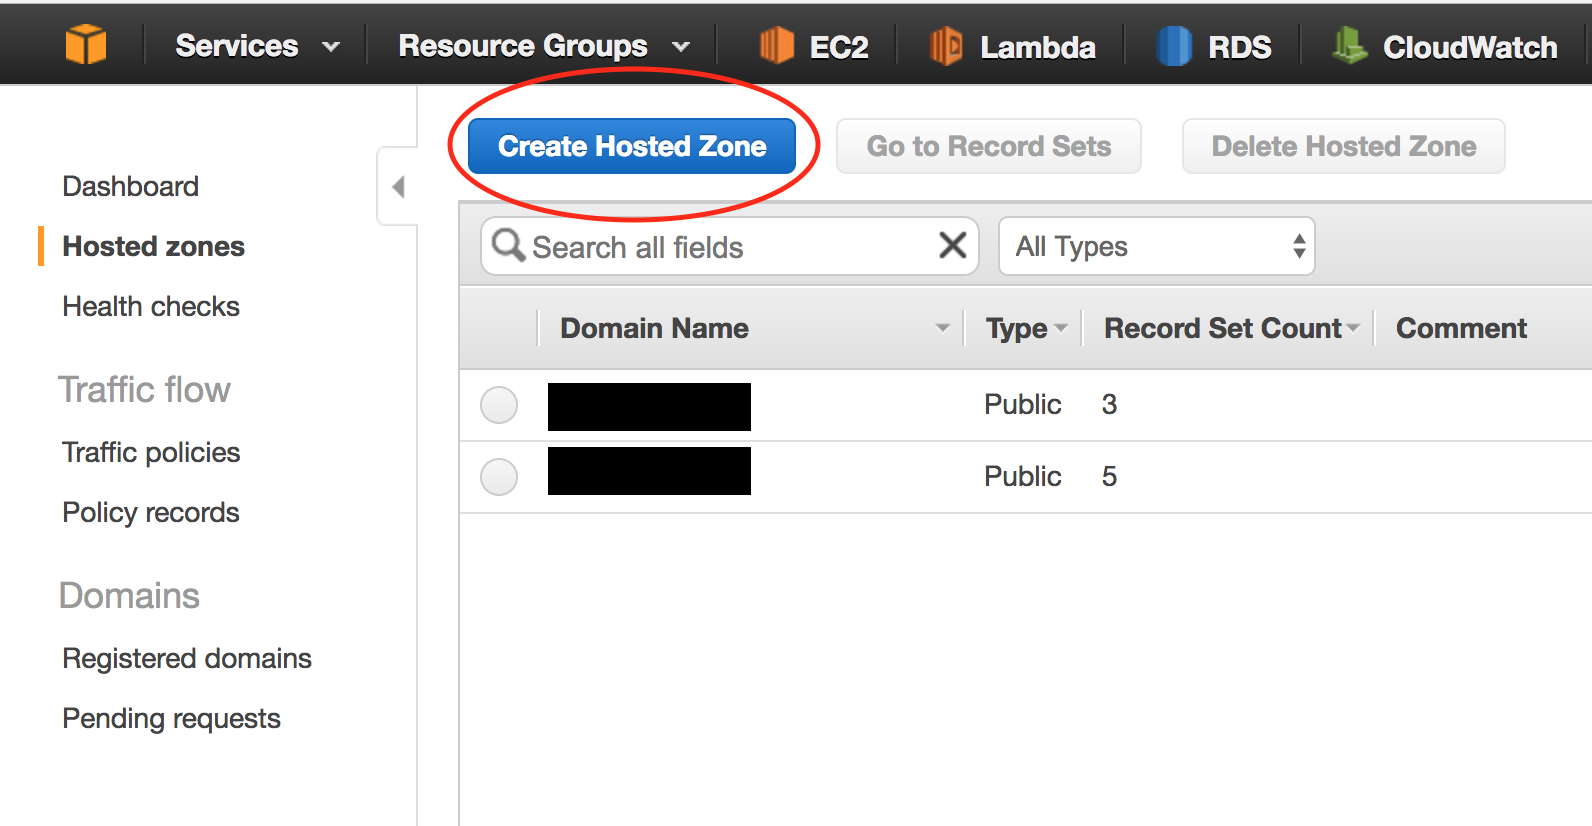
- Enter your custom domain name in the field and click “Create”.
- You’ll now see that Route53 has given you 4 DNS Name Server (NS) hosts. Make a note of these.
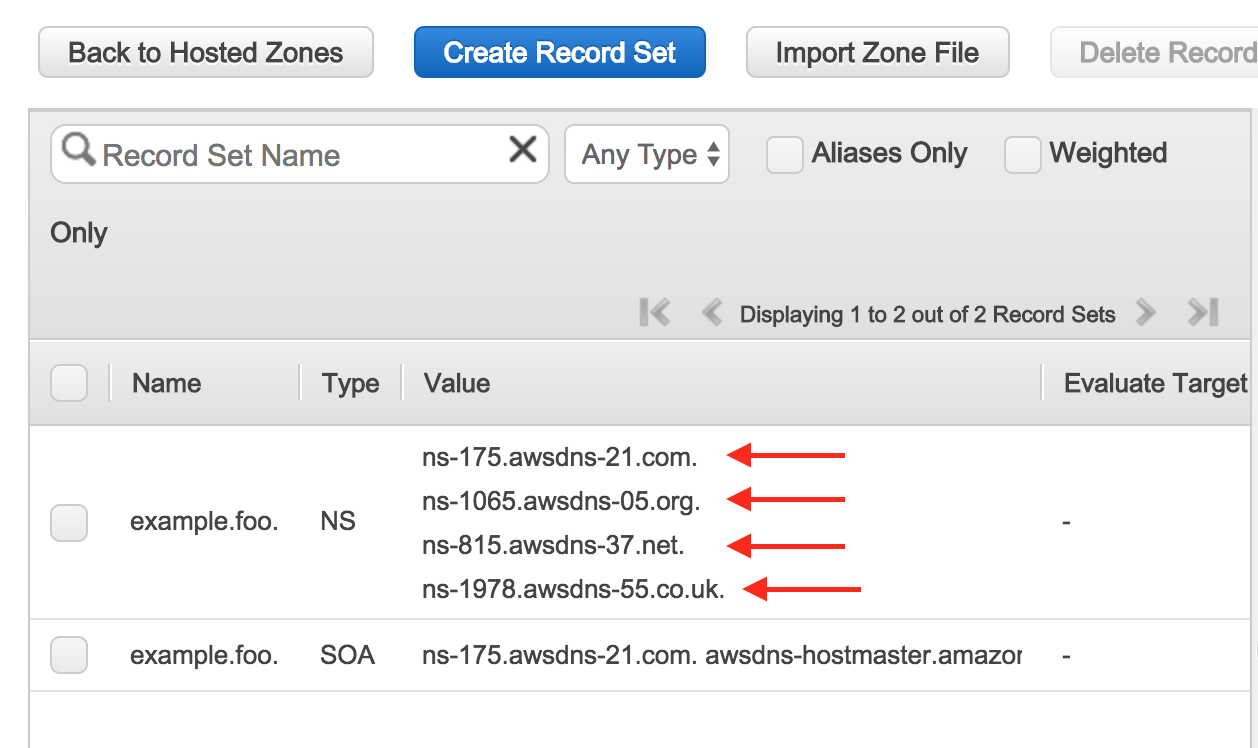
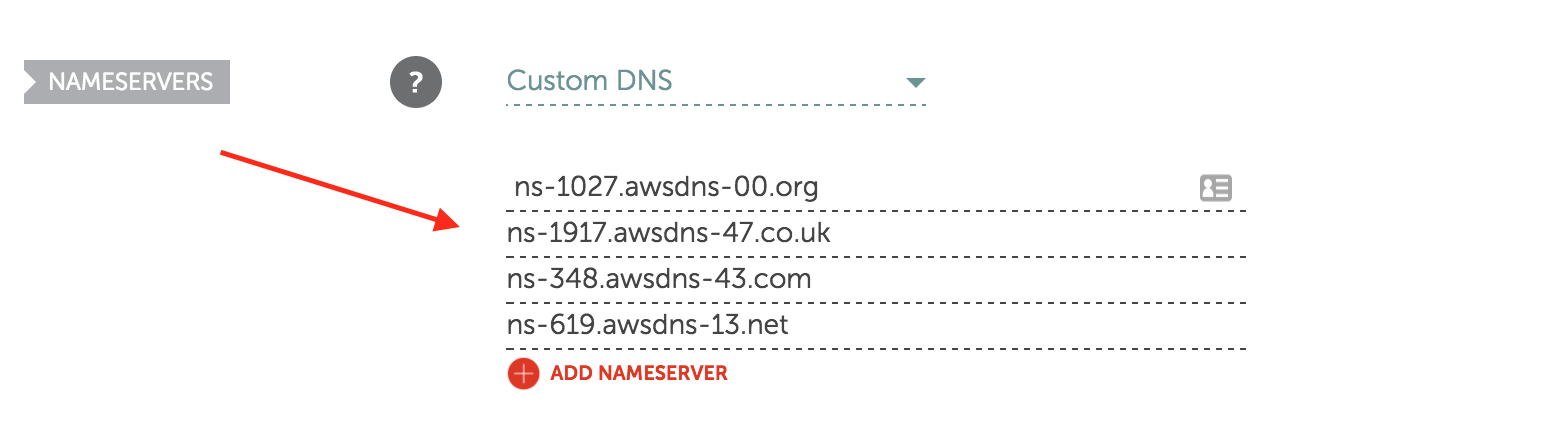
- Configure your custom domain with your domain registrar to use these Route53 name servers as the name servers for your domain. On NameCheap, you find the NameServer box, select “Custom DNS”, and enter the values given by Route53.
- Now go back to your Route53 hosted zone and click “Create Record Set”. Select “Yes” for “Alias”, leave the “Name” blank5, and under “Alias Target”, choose the CloudFront distribution we created earlier. Click “Create” to finish.
- (Optional) Click “Create Record Set”. Enter “www” in the “Name” box, select “Yes” for “Alias”, and for the “Alias Target”, scroll to the bottom and select the CloudFront record set you created for your apex domain. Click “Create” to finish. This routes “www.” to your apex domain.
And that’s it! It can take up to 48 hours for all your DNS change to propagate, but once that process has completed you should be able to navigate to your custom top-level domain and see your website being served over HTTPS.
A Word on Pricing
While enterprise-level AWS hosting fees balloon to be quite substantial, at a hobbyist scale AWS is extremely affordable.
Here’s a breakdown of the current pricing for the collection of services we’re using for hosting:
| Service | Cost |
|---|---|
| Route53 | $0.50/month |
| S3 | $0.023/GB/month for storage |
| CloudFront | $0.085/GB for bandwidth |
There are additional fees for S3 and CloudFront based on the number of requests you serve, but these are fairly minimal, and won’t drive your bandwidth costs if you’re working at small scale.
Disregarding bandwidth for a second, if we consider even relatively large site with 1 GB of static content, we’re only paying $0.52 a month as a baseline for our hosting.
Considering bandwidth, if we do 50GB/month of bandwidth - about 100k views assuming about 500kB per page view - our bandwidth costs would be $4.33.6
If you are even more price conscious, you can cut out CloudFront and serve content directly from S3 (though, you give up HTTPS). This cuts back on bandwidth costs by a bit.
You can play around with AWS’s own pricing estimator here.
Alternative DNS Routing Approaches
If you don’t want to have AWS handle your DNS, there are a couple of options you can look in to:
- Create a CNAME record from your apex domain to the CloudFront distribution or S3 bucket URL that Amazon gives you. However, there are reasons why this is not a great idea.
- Create a CNAME record from a subdomain (likely “www.”) to CloudFront or S3, and then add a redirect from your apex domain to the subdomain.
Both of these secondary approaches make setting up SSL a bit trickier.
Closing
AWS makes setting up highly available static hosting ridiculously simple at a relatively cheap pricing schedule. Once you’ve setup an S3 bucket to be served with CloudFront, you can update that bucket’s contents to make changes to your site without having to worry about the surrounding infrastructure.
It’s also worth looking into automating deployment of your site to S3 using AWS’s REST API.
Good luck in your future ventures with AWS, and I hope this guide was useful. 😄🤖
Footnotes
-
If you can’t redirect “admin@your-domain”, there are a list of other email addresses that you can also redirect which Amazon will use to verify your domain. ↩︎
-
You can also add a wildcard to your domain (i.e.
*.example.com), or any other subdomains that you expect to be using later on (i.e.api.example.com). Note that you can’t add subdomains later on, so be sure to think carefully before requesting a certificate. ↩︎ -
This isn’t critical with a CloudFront configuration, but it is necessary if you want to serve static content from just S3 without CloutFront. See this AWS guide for more details if you’re interested. ↩︎
-
If the vast majority of your audience is in the US and Europe, it’s probably wise to choose “Use Only US, Canada, and Europe”. There can be added expense for the wider distribution, which you may decide you don’t need. ↩︎
-
This is so that the apex of our custom domain (i.e.
http://example.com) is routed to CloudFront. Adding a value to this Name box is for routing subdomains. ↩︎ -
In fact, if you still fall under the 12-month “Free Tier” of AWS, your bandwidth costs would be a cool $0.00. 😎 ↩︎