
iOS Shortcuts is one of my favorite additions to iOS in its past several iterations. I used its predecessor, Workflow, for a while, but I didn’t invest too heavily in it because there was a nagging feeling in the back of my head that Apple would kill it at some point. However, they did the opposite!
Apple acquired Workflow and, in iOS 12, re-branded it as “Shortcuts” with more tightly integrated OS support and the full backing of Apple. As a result, I’ve been using Shortcuts pretty regularly now.

iOS Shortcuts
For those who haven’t used Shortcuts, it’s really 2 separate things:
- The first is a powerful graphical scripting engine that allows you to tie together behaviors and actions of various different apps. App developers have to expose (“donate”) behaviors to the system.
- The second component of Shortcuts is the ability for the user to trigger Shortcuts (or individual app actions) from Siri. I never use this (Siri still isn’t great).
Personally, I’ve added many data-tracking Shortcuts into my workflow. I’ve setup shortcuts to record runs, thoughts while I’m on-the-go, expenses, etc. It’s also quite nice to attach a log to other routine Shortcuts. Have a Shortcut for meditation? Waking up in the morning? It’s nice to capture a log entry each time you invoke those Shortcuts so you can see patterns in your data. As I’ve often noted, passive self-tracking is much easier (and produces more reliable results) than remembering to record things.
Here are a couple patterns I’ve built up for recording data using Shortcuts:
Dated Logs
A basic data capture technique that I’ve found useful is keeping a bulleted list, separated by date headers. I use this to keep track of random thoughts, technologies that I might want to check out, as well as less structured data. The format looks something like this:
…

## Feb 8, 2019
- Research spacial hashing
- Add "Designing Data-Intensive Applications" to reading list

## Feb 9, 2019
- Watch "State of Go" 2019
- Research LSM-Trees

…
I found this type of entry to be especially useful when on trips (i.e. jotting down restaurant names, places visited, etc.).
The “no-brainer” app to store this type of data would be iOS’ Notes app, but as of writing there, is no Shortcuts action to append to a Note – only to create a new note or open an existing note. The next best options are Bear and Drafts. I personally really like Drafts, so I used that.
Essentially, the approach is:
- Prompt for input.
- Check the designated note to see if it has today’s date header.
- Create the date header if necessary.
- Format and append the input.
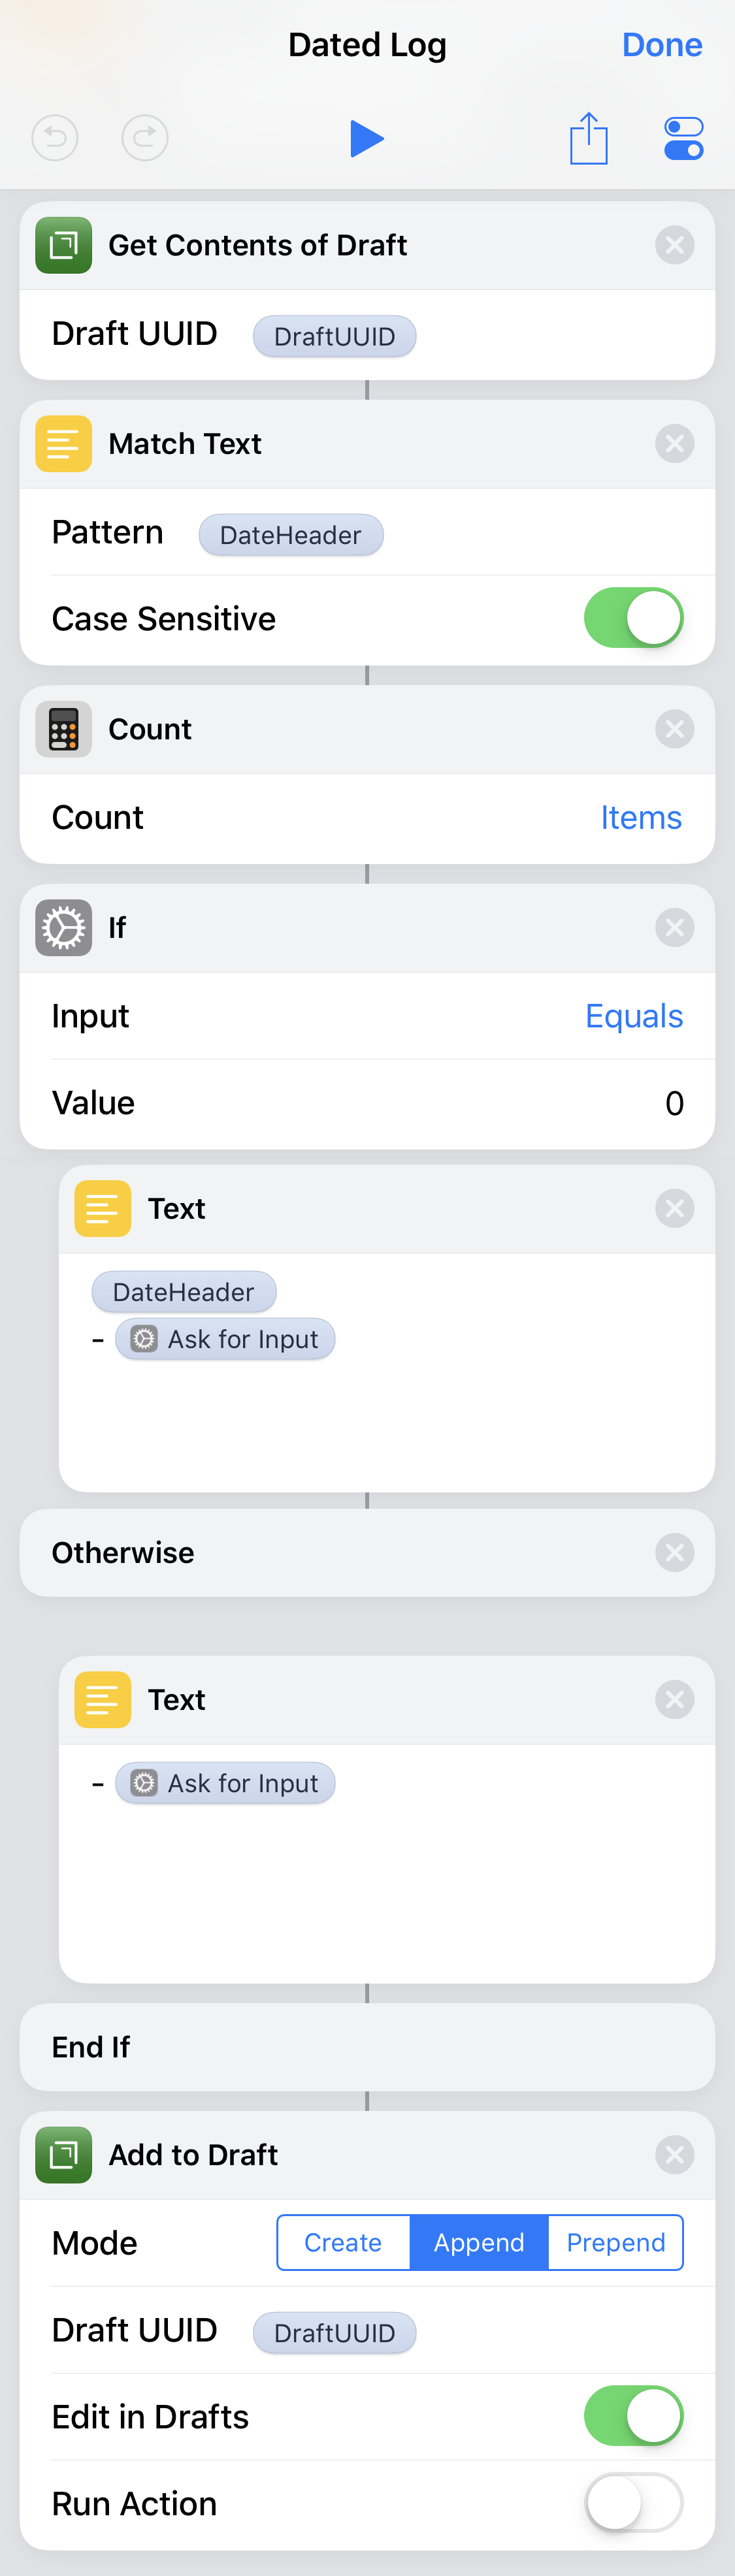
Dated Log Structure
In the above image, the Dated Header variable is created simply by prepending
the current date with the ## Markdown h2 header.
Here is a link to grab a premade Shortcut that creates a dated log in Drafts.
Spreadsheet Entry
For structured data, it often makes more sense to create some type of spreadsheet. I haven’t found a good iOS-native spreadsheet app that has the ability to append to a sheet within Shortcuts directly. So, for now, I’ve been using Google Sheets.
There are 2 methods that I use to interact with Google Sheets – the easy but limited way is IFTTT, the harder but more flexible way is to directly use the Google Sheets API using an app hosted on Glitch.
Via IFTTT
IFTTT is the quickest way to hook-up Shortcuts to Google Sheets. The approach is this:
- Prompt for input.
- Send the input to an IFTTT Webhook endpoint.
- IFTTT adds a new row to a specified Google Sheet with the provided contents.
However, you still need to jump through a few hoops. There isn’t a native integration between IFTTT and Shortcuts, so you need to trigger your IFTTT “applet” via their web API.
Federico Viticci has a comprehensive article on how to connect Shortcuts and IFTTT, but here’s a general overview:
- Enable the Maker Webhooks and Google Sheets services on IFTTT.
- Go to the
webhooks settings page
and record the unique URL it provides to you.
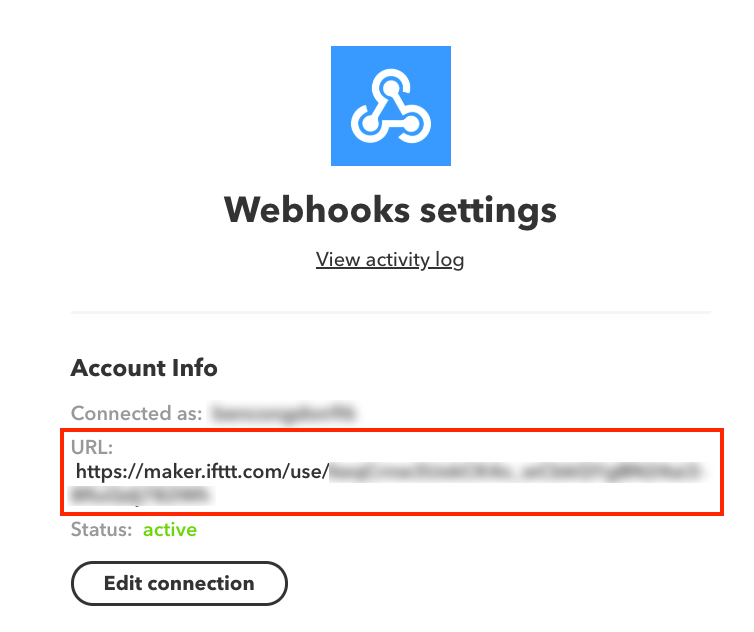
IFTTT Webhooks Settings
- Create a new IFTTT applet that takes as input
the a Webhook event and produced the output of appending to a Google sheet.

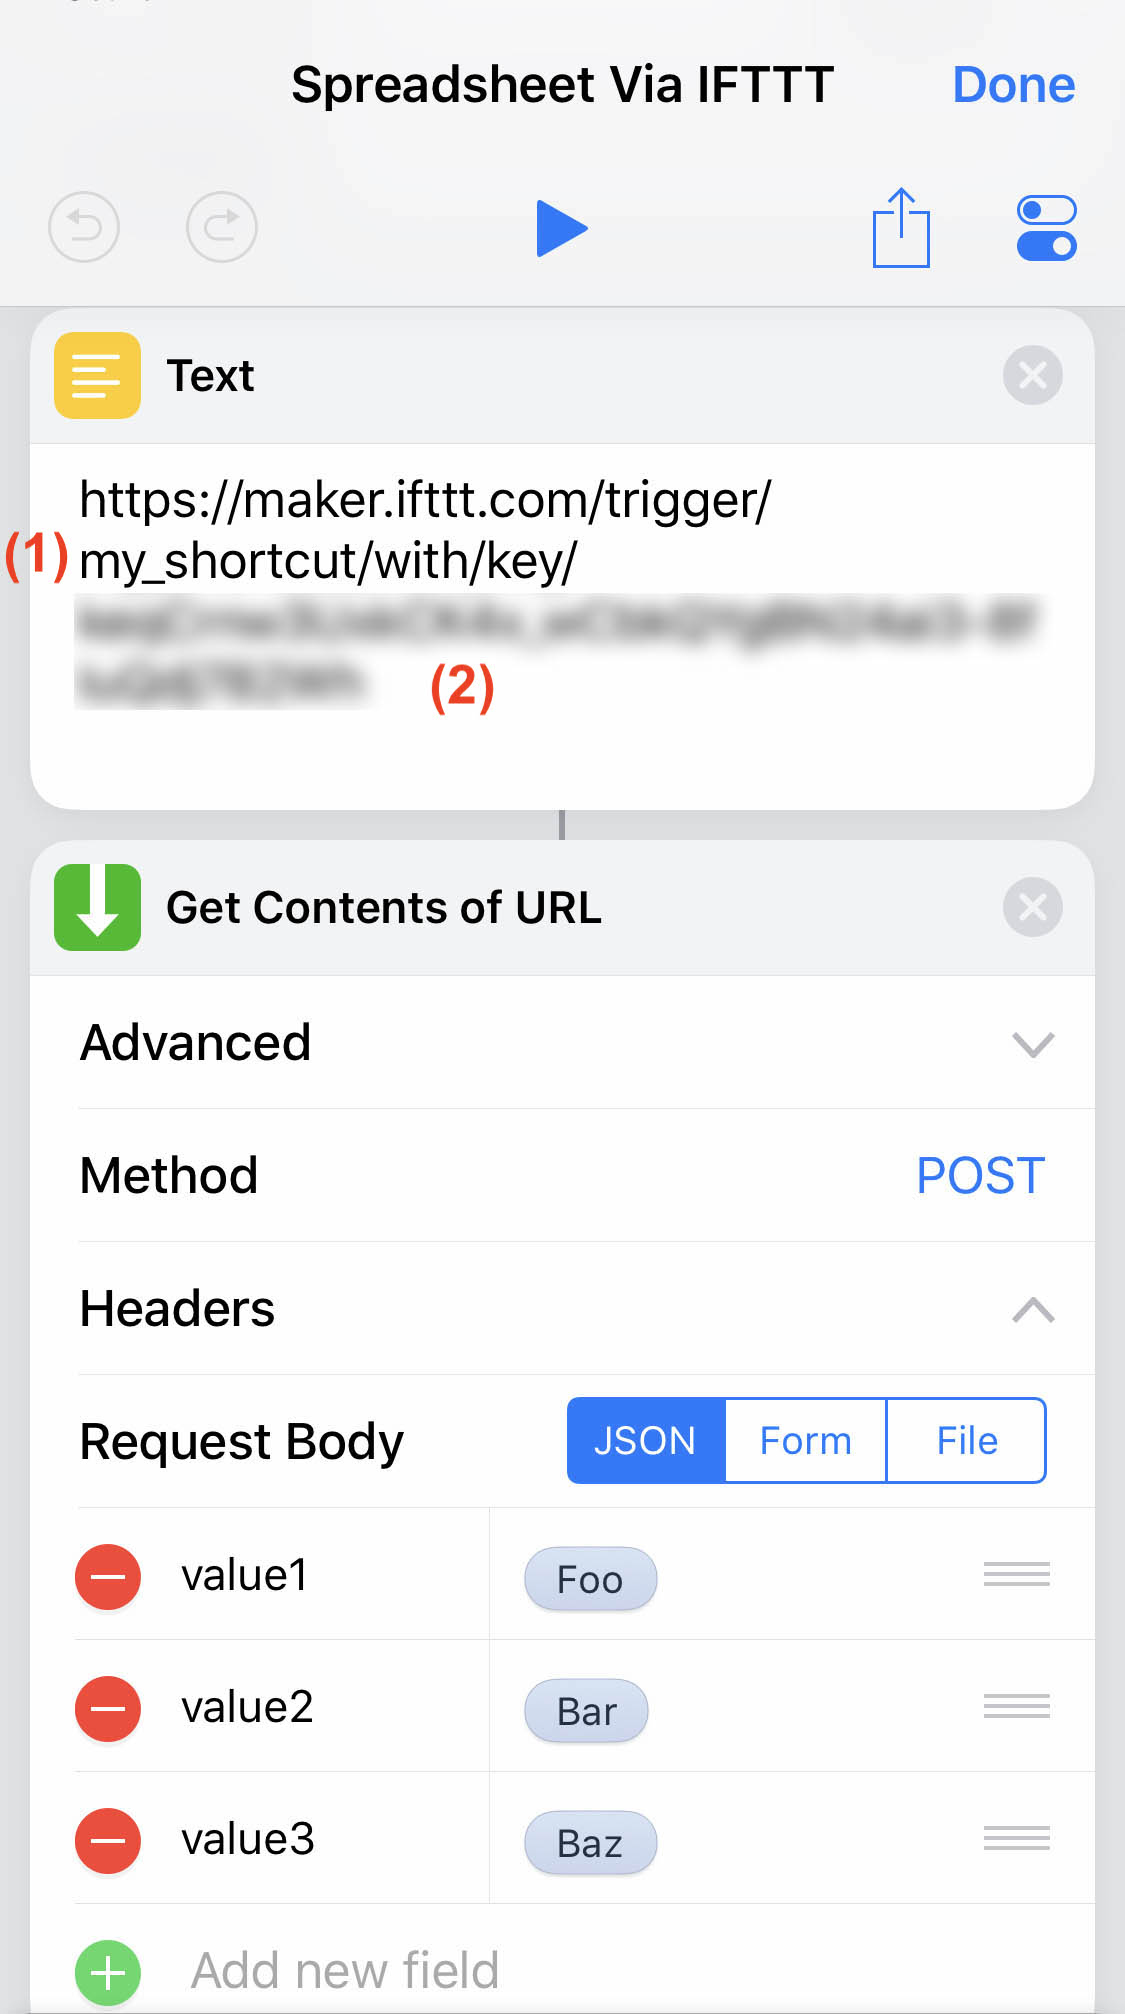
- Create an iOS Shortcut that prompts for input as you’d like. Then, add a Text
field that contains the special URL shown below. Substitute the event name
you chose when making the IFTTT applet for
(1)and your Webhooks secret key for(2). Next, create a “Get Contents of URL” action that uses thePOSTmethod. Click advanced, and add the fieldsvalue1,value2andvalue3.1
- The values for these JSON fields can be whatever you like – and will depend on what you’re using the shortcut for. For example, if you were tracking your expenses, these values could be the expense description, amount, and date.


If you run the iOS shortcut, you should see that the values you enter show up on the Google Sheet you specified in the IFTTT applet. Neat!
Of course, there’s an unfortunate limitation: You’re restricted to at most 3 dynamic values per spreadsheet row. However, if each row you’re entering needs 3 or fewer values, IFTTT is a great choice.
Via Glitch + Google Sheets API
Some of my data entry spreadsheets have more than 3 values per row, so IFTTT wasn’t going to cut it. For example, my run-tracking spreadsheet has columns for the date, duration, distance, terrain type, and perceived exertion.
To get around the limitation of IFTTT I decided to integrate directly to the Google Sheets API. Since Google Sheets has a more complex API and authentication scheme, I wrote a little Glitch app that provides a single endpoint for my shortcut to call. This endpoint accepts a Google Sheet ID (so we can reuse this app for multiple sheets) as well as a dynamically long list of values to append to the sheet.
In principle, there’s nothing special about Glitch that allows this to work. You can host this little app anywhere.2 But, Glitch is free and it’s simple to set up.
-
Create an app on Google’s API dashboard and enable the Google Sheets API. Create and download an OAuth client ID and client secret. There’s more detail on how to do this in the “Getting Started” section of this repo.
-
Create a new Glitch app using the “Clone from Git Repo” option, and clone from
https://github.com/bcongdon/google-sheets-shortcut.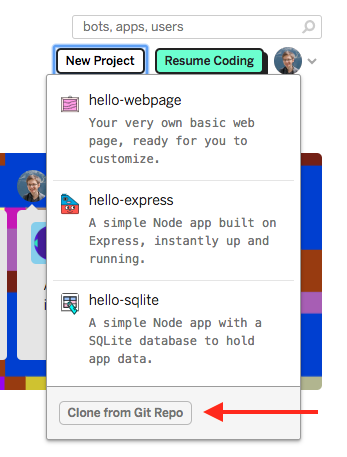
-
Now enter the OAuth client ID and client secret in the
.envfile of your Glitch app. You can leave therefresh_tokensecret for now. -
Sign in via the link on your created Glitch app’s home page.
-
After signing in, open your Glitch app’s console. Record the created OAuth
refresh_token. Save this to your.envfile.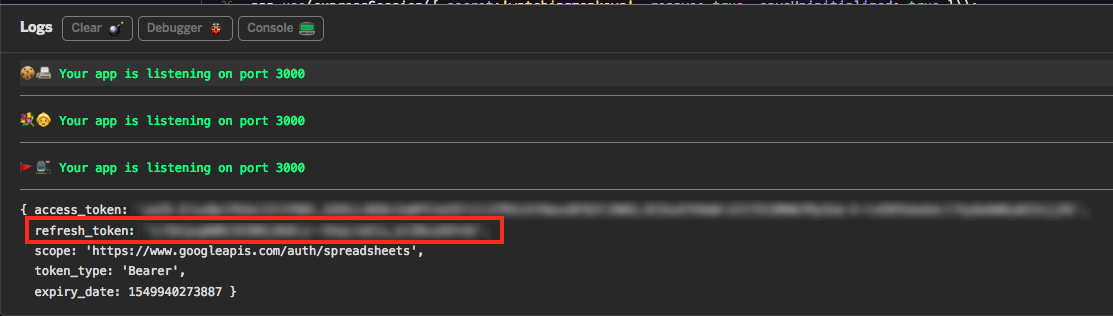
-
Generate a secret key to authenticate yourself with your Glitch app. This is similar to the IFTTT secret token and is to make sure that you’re the only person who can call this endpoint. A good way to generate a random key is to run
openssl rand -base64 24in your terminal. -
You can now call the endpoint with a POST to
https://YOUR-PROJECT-NAME.glitch.com/spreadsheetand the following JSON body structure:{ // This must match the secret key in your .env file "secret_key": "some secret" // A list of values to append to the spreadsheet as a single row "data": ["foo", "bar", "baz"] // Optional.The spreadsheet to edit. // (defaults to the SHEET_KEY set in .env) "spreadsheet_key": "" // Optional. Where to append the new row // (useful if you want to append on the non-default tab of a sheet) "spreadsheet_range": "" }


The JSON POST request is done identically to the IFTTT version of Spreadsheet
Entry, except now you can pass an arbitrary list of values in the data key.
Assuming you’ve set up everything correctly, you should now be able to create a
row in a Google sheet with an arbitrary number of fields. 👍
It’s a bit of a chore to put all of this in place. Though, once you’ve got it working, it should stay solid. I’ve been using this approach for over a month, as of writing, and have been really happy with how Glitch has worked for this.
Conclusion
Taking a step back, I’m still impressed by the power of Shortcuts. The fact that it can perform arbitrary HTTP requests (and even run scripts over SSH!) is empowering against the backdrop of the relatively restricted iOS ecosystem. It’s really great to see that iOS lets you dig a little deeper into its internals – and this really expands the scope of what our phones can do.
Before Shortcuts, I’d often find myself frustrated with minor limitations of apps. “This would be perfect if only I could just hook X and Y together”. Shortcuts is at its best when it allows users to pave over these “papercuts” by stringing actions together.
Shortcuts isn’t perfect: iOS should really allow apps to expose custom interfaces within the Shortcuts script builder, and the app support for Shortcuts still has a long way to go. However, I’ve made several little “applets” within Shortcuts that have made me a lot happier using my phone.
-
It isn’t necessary to have all 3 values, but note that the field names are important. (i.e. field keys need to be named like
value1to be interpreted correctly by IFTTT) ↩︎ -
In fact, a great place to host these types of “Shortcuts API Connectors” are serverless platforms like AWS Lambda and CGP Cloud Functions. ↩︎